Facebook Pixel Advertising, Easily Explained
How a small piece of code can automate and scale your sales follow up

Want an unlimited army of salespeople to follow up with your best prospects 24/7? Learn how Facebook Pixel advertising can automate and scale your follow up as we show you how to find, install and use the mighty Pixel to get 3 to 10 times more conversions and sales.
May 20, 2017 by Taylor
Imagine having an unlimited army of salespeople.
If you have a Facebook advertising account, you have access to The Facebook Pixel. This small piece of code, if used correctly, can become an army of salespeople for you.
Simply put, a Pixel is a small piece of Javascript code that is placed on your website and landing pages. Whenever someone visits your site, the pixel communicates with Facebook and matches your website visitor with their database of active users. If there’s a match, that visitor gets added to an “audience” so that you can follow-up with them later using Facebook’s advertising platform.
When you install the pixel on your pages, you can:
• Build audiences of your website visitors that you can follow-up with through retargeting on the Facebook advertising platform.
• Collect data on visitors, that you can use to create higher converting ads.
• Track your conversions so you know exactly how many leads and sales were generated from an ad campaign and how much an average sale costs you.
Clone your website visitors with “lookalike” audiences. Facebook will actually find people with similar interests and demographics as your visitors so you can expand your list of prospects and scale your business.
Here’s a quick pic of what a pixel looks like:
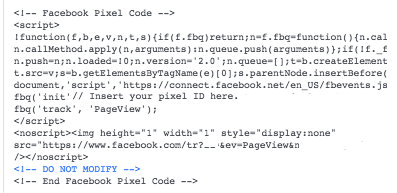
Scary, huh?
Here are the best ways to use the Facebook Pixel for following up with your website visitors. (Retargeting)
Even if you’ve never heard of retargeting (a.k.a. remarketing) you’ve probably still experienced it. Ever been on Amazon, looked at a pair of shoes but didn’t buy them? Then 10 minutes later while you’re on a different site you start seeing Amazon ads for those same shoes? That’s retargeting and it’s incredibly effective.
The average click-through rate (That’s how often people who view your ad actually click on it) for normal display ads is 0.07%. For retargeting ads, the rate is up to 10 times that amount.
To use the pixel to follow-up with your website visitors, you will need to create a custom audience in the Facebook advertising platform. An audience is essentially a list of people who have visited your website or specific pages on it. Remember the pixel merely matches your visitors with Facebook’s database. If you want to actually communicate with those visitors, you have to tell Facebook how you want them to collect and organize that data. You do this by creating custom audiences.
Here are the most effective options when it comes to making these audiences:
1. Create an audience of people who have visited your website in general. This is a great group to build awareness of your company with by showing them branding ads.
2. You can target people who have visited specific pages on your site. So if you only want to target people who spent time on pages with similar content, then this is the option for you. To learn more about how we use this strategy click here.
3. You can target people who have been on certain pages but not others. Want to follow-up with visitors who looked but didn’t buy? Choose this option.
4. You can follow-up with people who haven’t visited in a while. This is a great option to use to reignite someone’s interest in your company.
5. You can target people based on the amount of time they spent on your website. This audience can be one of your most qualified.
6. Create a lookalike audience of any of the previous ones. Facebook will essentially clone any of the audiences above so you can expand your reach with people who are most like the ones in yours.
7. Create a custom combination of any of the ones above.
Remember there is now only ONE Facebook pixel per Facebook ads account.
1. From your Facebook Ads Manager, click on the hamburger icon in the upper left corner.

2. Click on All Tools
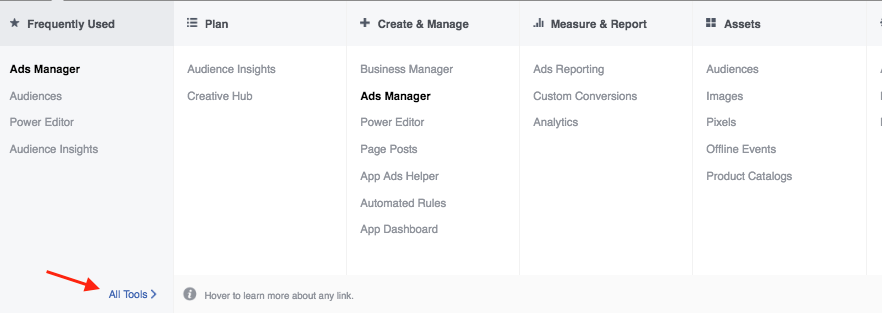
3. Click on Pixels
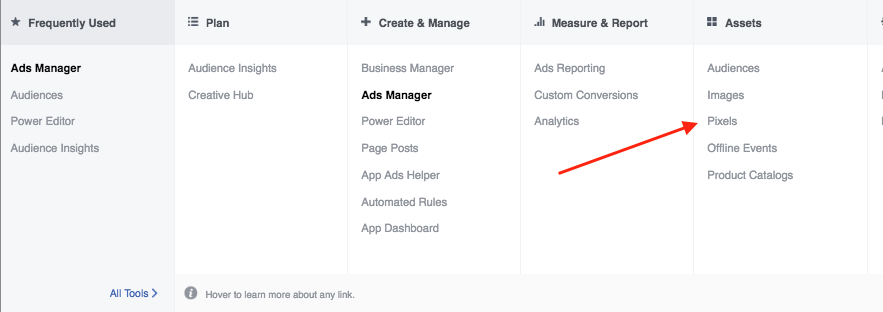
4. Select “Setup Pixel” button

5. Choose “Copy and Paste the Code”
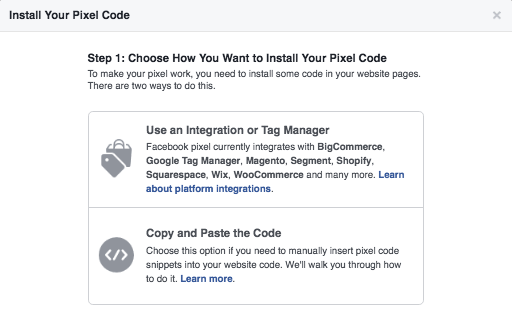
If you want to follow-up with people who have visited any page of your website through Facebook retargeting, place the pixel between the “head” tags of your website theme. This way the pixel will show up on every page of your site and saves you the trouble of manually placing it on every page. If you’re proudly non-techy and want someone else to install it, click here.
HOW TO VERIFY THE FACEBOOK PIXEL IS WORKING:
1. After placing the pixel on your site, save and reload the page.
2. Go into the Facebook Ad Manager, click on the hamburger, go to “assets”, click on “pixels” You will see the pixel analytics there.
If you are using the Chrome browser, download the Facebook Pixel Helper extension.
And that’sit -you’ve installed the Facebook pixel!
To learn more about retargeting and how it works, click below.
Source: Retargeting Ad Statistics
If you have a Facebook advertising account, you have access to The Facebook Pixel. This small piece of code, if used correctly, can become an army of salespeople for you.
What's a pixel?
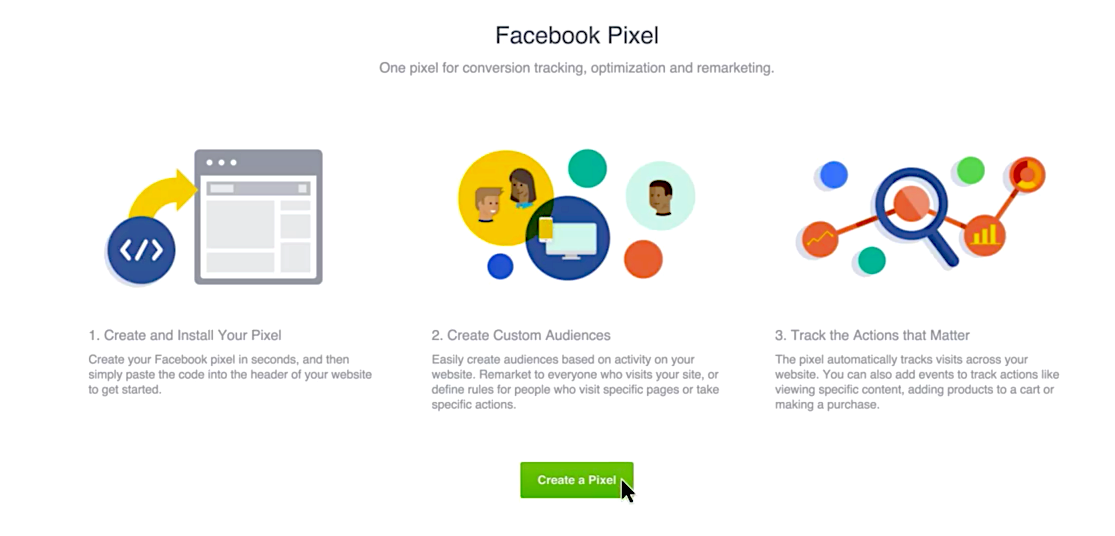
Simply put, a Pixel is a small piece of Javascript code that is placed on your website and landing pages. Whenever someone visits your site, the pixel communicates with Facebook and matches your website visitor with their database of active users. If there’s a match, that visitor gets added to an “audience” so that you can follow-up with them later using Facebook’s advertising platform.
When you install the pixel on your pages, you can:
• Build audiences of your website visitors that you can follow-up with through retargeting on the Facebook advertising platform.
• Collect data on visitors, that you can use to create higher converting ads.
• Track your conversions so you know exactly how many leads and sales were generated from an ad campaign and how much an average sale costs you.
Clone your website visitors with “lookalike” audiences. Facebook will actually find people with similar interests and demographics as your visitors so you can expand your list of prospects and scale your business.
Here’s a quick pic of what a pixel looks like:
Scary, huh?
Here are the best ways to use the Facebook Pixel for following up with your website visitors. (Retargeting)
Even if you’ve never heard of retargeting (a.k.a. remarketing) you’ve probably still experienced it. Ever been on Amazon, looked at a pair of shoes but didn’t buy them? Then 10 minutes later while you’re on a different site you start seeing Amazon ads for those same shoes? That’s retargeting and it’s incredibly effective.
How effective?
The average click-through rate (That’s how often people who view your ad actually click on it) for normal display ads is 0.07%. For retargeting ads, the rate is up to 10 times that amount.
Website visitors who are retargeted with display ads are up to 63% more likely to convert on your website.
To use the pixel to follow-up with your website visitors, you will need to create a custom audience in the Facebook advertising platform. An audience is essentially a list of people who have visited your website or specific pages on it. Remember the pixel merely matches your visitors with Facebook’s database. If you want to actually communicate with those visitors, you have to tell Facebook how you want them to collect and organize that data. You do this by creating custom audiences.
Here are the most effective options when it comes to making these audiences:
1. Create an audience of people who have visited your website in general. This is a great group to build awareness of your company with by showing them branding ads.
2. You can target people who have visited specific pages on your site. So if you only want to target people who spent time on pages with similar content, then this is the option for you. To learn more about how we use this strategy click here.
3. You can target people who have been on certain pages but not others. Want to follow-up with visitors who looked but didn’t buy? Choose this option.
4. You can follow-up with people who haven’t visited in a while. This is a great option to use to reignite someone’s interest in your company.
5. You can target people based on the amount of time they spent on your website. This audience can be one of your most qualified.
6. Create a lookalike audience of any of the previous ones. Facebook will essentially clone any of the audiences above so you can expand your reach with people who are most like the ones in yours.
7. Create a custom combination of any of the ones above.
So, think you might be ready to create your own pixel? Here's how:
Remember there is now only ONE Facebook pixel per Facebook ads account.1. From your Facebook Ads Manager, click on the hamburger icon in the upper left corner.
2. Click on All Tools

3. Click on Pixels
4. Select “Setup Pixel” button
5. Choose “Copy and Paste the Code”

Where does the Facebook Pixel go?
If you want to follow-up with people who have visited any page of your website through Facebook retargeting, place the pixel between the “head” tags of your website theme. This way the pixel will show up on every page of your site and saves you the trouble of manually placing it on every page. If you’re proudly non-techy and want someone else to install it, click here.
HOW TO VERIFY THE FACEBOOK PIXEL IS WORKING:
1. After placing the pixel on your site, save and reload the page.
2. Go into the Facebook Ad Manager, click on the hamburger, go to “assets”, click on “pixels” You will see the pixel analytics there.
If you are using the Chrome browser, download the Facebook Pixel Helper extension.
And that’s
To learn more about retargeting and how it works, click below.
WANT HELP PLACING YOUR PIXEL? CLICK HERE |
Source: Retargeting Ad Statistics
